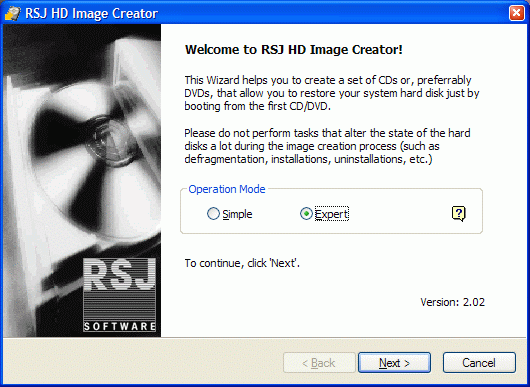
Start the program by clicking on the RSJ HD Image Creator entry in the Start Menu. The following dialogue appears:
If you own a licensed copy (Professional Edition, Service Edition or Deployment Edition), your name (the name of the licensee) is display at the bottom of this page.
Operation Modes
Simple mode
Simple mode creates a backup with just a few mouse clicks and no configuration settings asked. It is intended for the normal user that does not need any of the advanced options available in Expert Mode. In Simple Mode, a backup of the system partition (the one the computer starts from, and usually the only partition) is created on the first CD/DVD recorder found.
Expert Mode
Expert Mode allows advanced options to be specified by the user. These options are:
- the partition to create a backup of
- the target device type (either DVD/CD recorder or regular file)
- the target recorder or file
- retrieval of a standalone DOS program to restore the backup (needed if the backup was created as a regular file)
- comments, author etc. about the backup
- options for unattended restore
- Volume Shadow Copy
More about these options can be found below.
Choose the desired operation mode and click "Next" to continue.

This dialog shows the restrictions concerning the Personal Edition. It does not appear if you purchased a license (see above). Click "Next" to continue. Depending on the chosen operation mode, different dialogs appear:
Operation Mode "Simple"
In Simple Mode, that's about it. RSJ HD Image Creator displays a summary screen and ask for a confirmation by pressing the "Finish" button, after which the backup process starts.
Operation Mode "Expert"
Source Partition
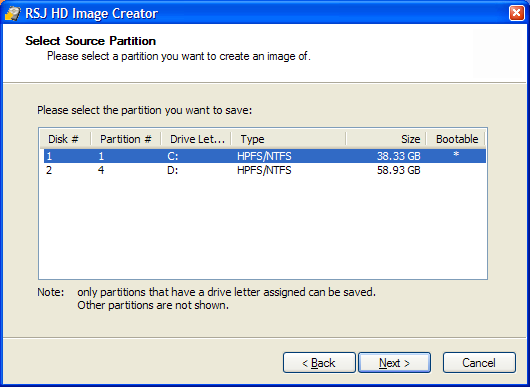
The first screen displays a list of partitions that HD Image Create can backup. Select a partition and click "Next".
Backup Medium
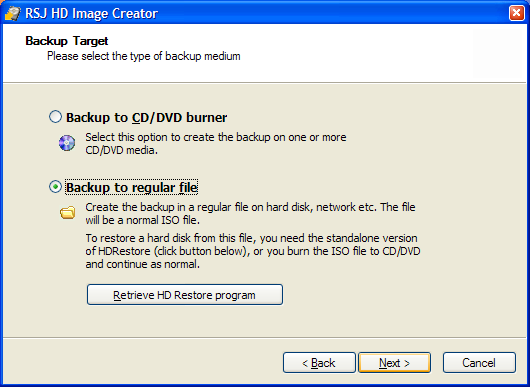
The backup medium can be either a DVD/CD recorder or a regular file (on a hard disk or network drive, for example).
Backup to DVD/CD
For recorder backups, a list with available recorder devices is displayed allowing the selection of the target recorder. If the desired recorder is not listed but is connected (USB/FireWire), press the Rescan button.
Backup to File
Clicking Next with Backup to regular file selected will present a page that allows to specify file name for the target file, and, among others, the maximum volume size. The files created will be ISO files that can be burned to CD or DVD; if you plan to do so, select the appopriate volume size for the target medium. If not, we recommend to limit the file size to 2GB.
The DOS program used to restore a backup from a file can be retrieved by clicking the "Retrieve HD Restore program" button. Please choose the path where the program should be saved. To continue click "Next".
Unattended Restore
If you want to create an image that allows an unattended restore (without any user interaction) please check the box "Unattended restore". Please note that the options for unattented restore are available in the Professional Edition only.

Please note that if you select this option the restore operation will overwrite the first partition found in the system.
If necessary activate the options "Restore Master Boot Record" or "Restore primary partition table".
Language
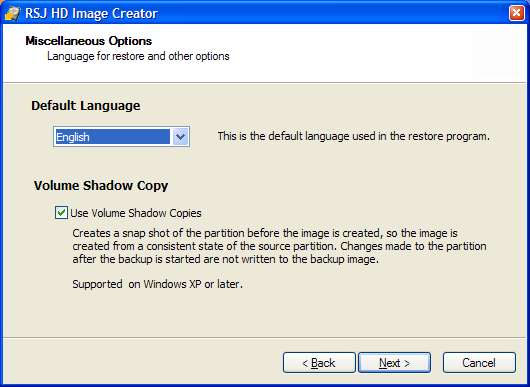
Choose the default language which is used in the restore program (english, german).
If you want to create a snap shot of the partition before the image is created please activate "Use Volume Shadow Copies". Activating this option the image will be created form a consistent state of the source partition.
Click "Next" to continue.
Image Description
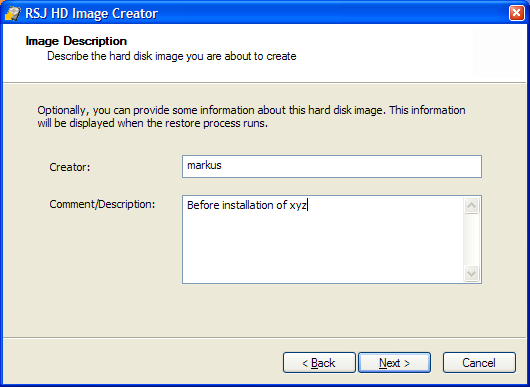
Optionally you can provide some information about the hard disk image. This information will be displayed when the restore process runs. Click "Next" to continue.
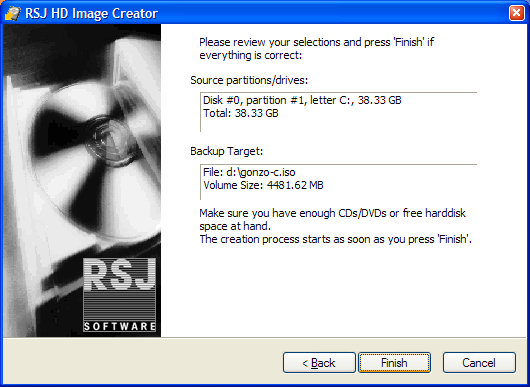
Please review your selections and press "Finish" if everything is correct. The creation process starts as soon as you press "Finish".